Today I’ll show you how to set up an online shop in a Blogger blog completely free using the BetaCommerce Blogger Template. BetaCommerce is an ideal eCommerce solution for small business owners to quickly create an online store in minutes and start selling products with ease. The BetaCommerce Shopping Blogger Template offers multiple customization options, an easy-to-use flexible admin panel, and plenty of professional eCommerce features. It’s perfect for any online shopping site, showcase, or even portfolio, and could be the game-changer your online business needs.
BetaCommerce Shopping Blogger Template is a perfect eCommerce solution for small business owners to quickly setup an online shopping store within minutes
 |
| First of all download one free copy in your desktop/computer |
Get Ready for Setting up Own Blogger Online Shop
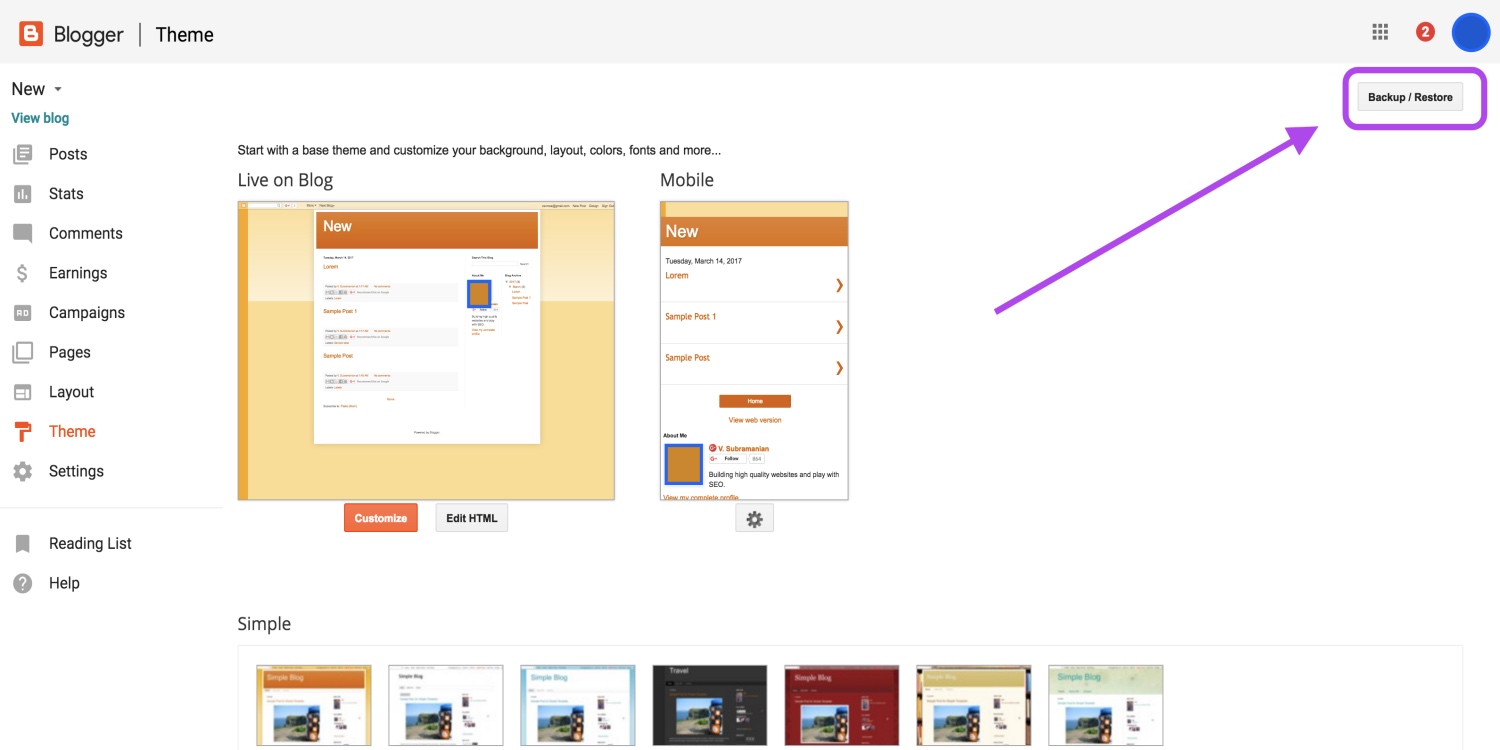
- To access the Theme section, select the blog you want to update from your Dashboard (if you have multiple blogs), then click “Theme” in the options panel on the left.
- Access Backup / Restore: Look at the top right corner, you will see “Backup / Restore” button and click it on.
- Get ready to upload: Manage on pop-up windows and click “choose file” button and look for the folder that is created after extracted file that you have downloaded.
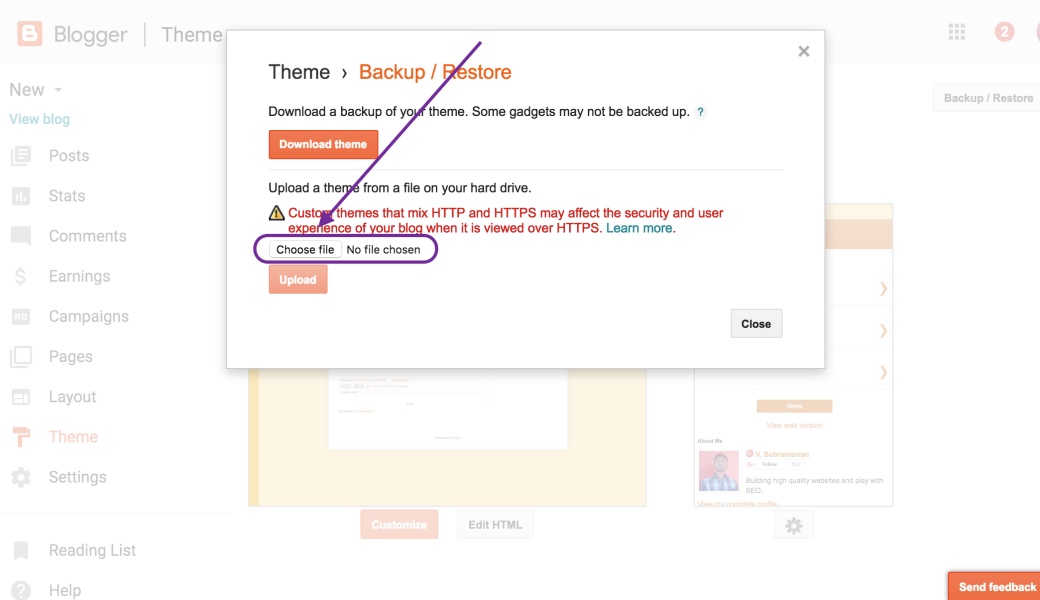
- Start uploading template: Click “Upload” button. Now uploading process appears on your screen.
Why you need to Choose BetaCommerce for your Blogger Online Store
- 100% Pure Responsive: It has become a standard, which is why this template is fully responsive to almost all devices, including Android, iPhone, tablets, desktops, and more.
- PayPal Payment Method: PayPal is one of the most trusted and widely used payment methods for online shoppers, so this theme comes with built-in PayPal integration. To set it up, simply enter your PayPal email address, and you’re good to go. For more information, check the documentations.html file in your downloaded package.
- Billing System: To create a professional shopping store on Blogger, it’s important to collect all the buyer’s details, such as address, phone number, number of items purchased, and so on. Before proceeding to payment, the buyer should fill out a billing form to store all this information for you. This data will then be sent to the email address linked to your blog.
- Newsletter Feedburner Widget: To keep users updated on new products, we’ve added a newsletter Feedburner widget that can help boost product sales. Featured Image Slider: Every online store needs a featured section to showcase the latest and discounted products to drive sales. This theme includes an image slider that’s simple to customize and edit.
- Testimonial Page: Customer reviews play a key role in making a business successful. That’s why we’ve added a testimonial page where you can share your customers’ feedback and opinions.
- Review Your Cart: Before proceeding to payment, users can review the products they plan to purchase and remove any items if needed. We hope this template will be helpful for independent business owners looking to launch their online shopping store on Blogger. The theme includes an Admin Panel accessible from the layout area. If you enjoy this theme, feel free to share it with friends who use Blogger.
We’re hoping our template will be a great fit for business owners looking to grow their ventures by setting up an online shopping store on Blogger. Share your thoughts, suggestions, and any issues with the Mega Shop template in the comments below.
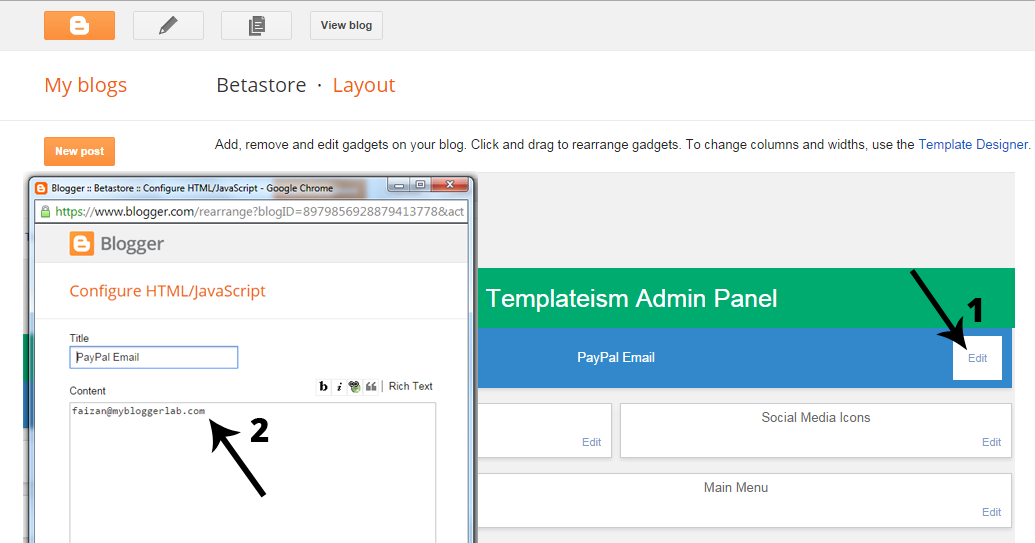
How to Change PayPal Email:
To receive payments, you’ll need a PayPal account, whether it’s a personal starter or business account. Any fully approved PayPal account will work just fine. To change the PayPal email address for receiving payments, follow these steps.
- Go to Blogger >> Layout >> PayPal Email >> Edit
- In the text area enter your PayPal Email address
- Save the Widget, Press "Save" Button
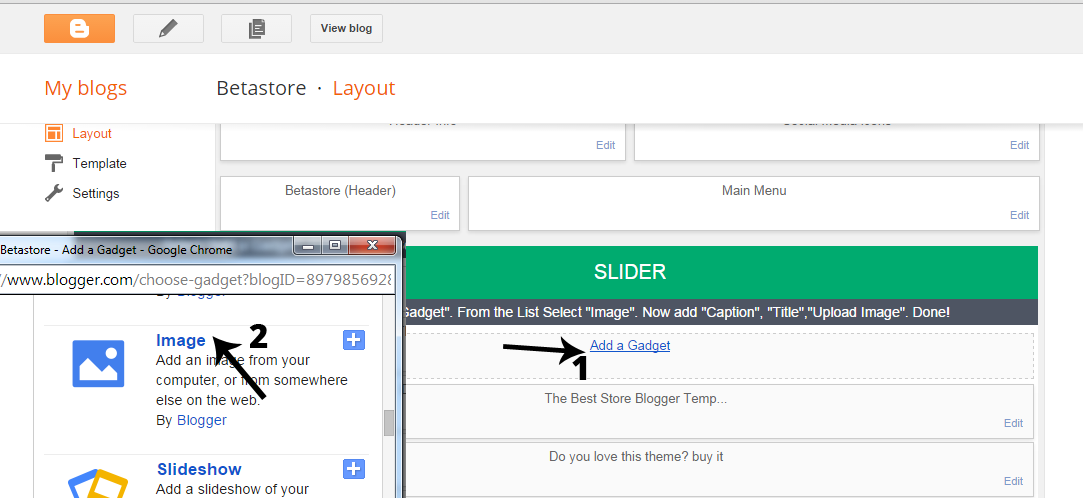
How to Edit (Homepage) Slider
You can edit, add or delete slider slides with great ease using "Templateism Admin Panel"
- Go to Blogger >> Layout >> Slider >> Add a Gadget
- From the list Select "Image"
- Upload Slider Image, Add Title, Caption and Link if needed
- Save the Widget, Press "Save" Button
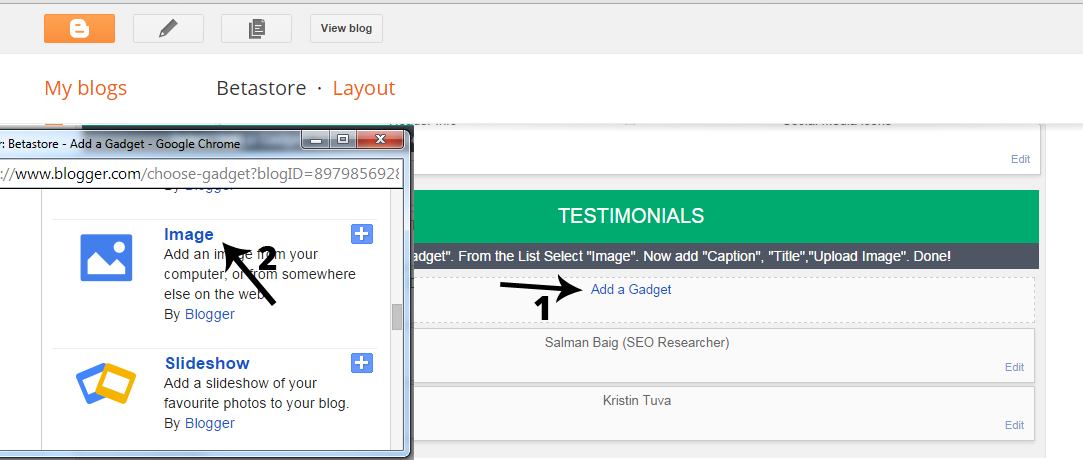
How to add (Homepage) Testimonials
You can edit, add or delete Testimonials with great ease using "Templateism Admin Panel"
- Go to Blogger >> Layout >> Testimonials >> Add a Gadget
- From the list Select "Image"
- Upload Testimonial image, Add Title, Caption and Link if needed
- Save the Widget, Press "Save" Button
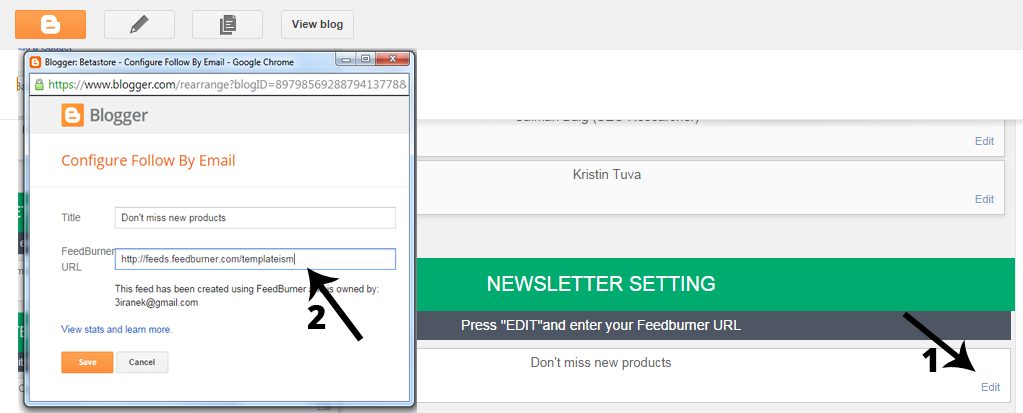
How to Edit Newsletter Widget
The newsletter widget lets you send automatic updates straight to your subscribers’ inboxes, making it a great way to keep them informed about your latest published articles.
- Go to Blogger >> Layout >> Newsletter >>Edit
- Enter Your Feedburner URL
- Save the Widget, Press "Save" Button
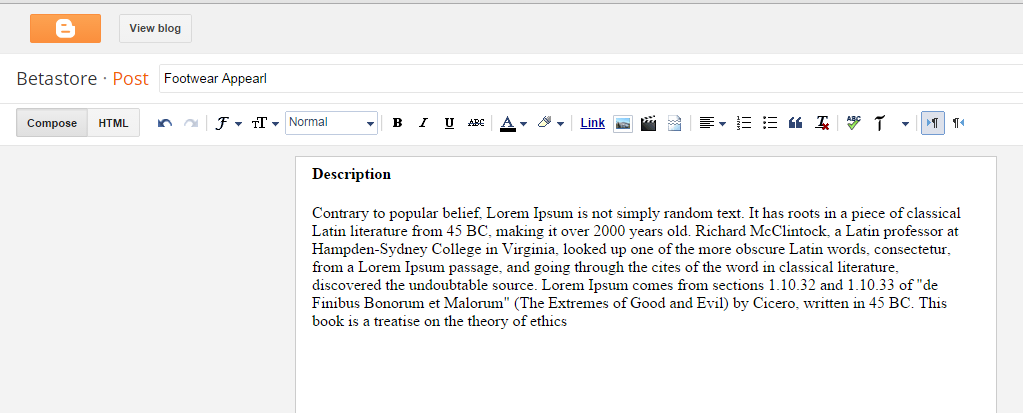
How to Add a Product?
To add a new product, just follow the same steps you normally take when publishing a regular article on Blogger.
- Go to Blogger >> Add a New Post
- Enter title, Upload Product Image, etc
- Once everything is done, press "Publish" and your product is live ready to sell
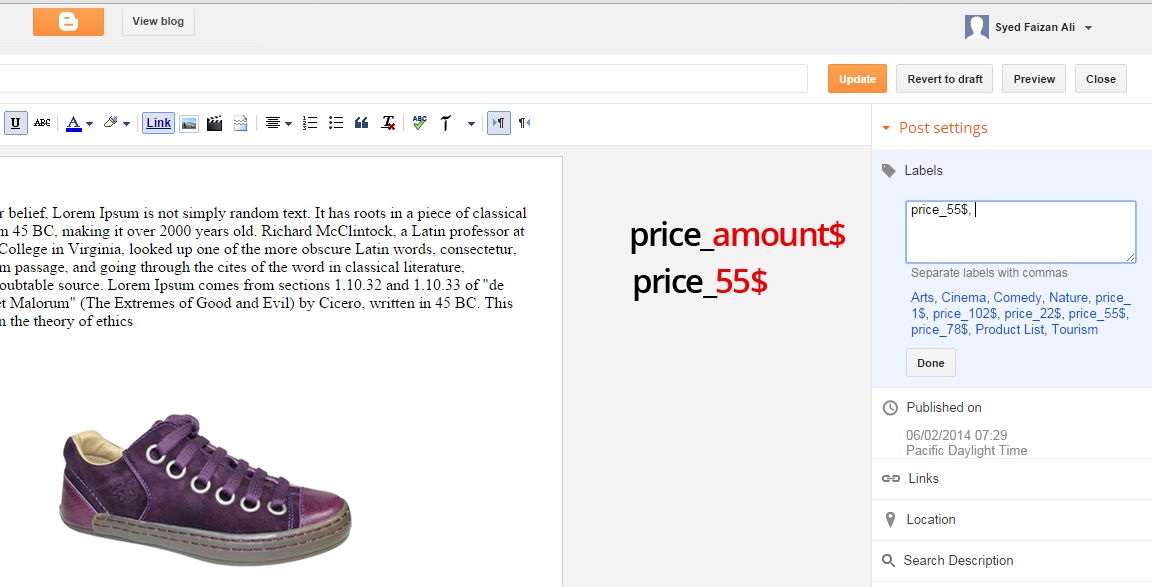
How to Add Price to a Product
Every Thing has its price, so we have to put up the price for our different products.
- Go to Blogger >> Add new Post >> Labels
- In Labels enter price_50$ (Where 50$ is the price of the product).
- Once everything is done, press "Publish" and your product is live ready to sell